
 2014 marks the centenary of military aviation in Australia. To commemorate this I am writing a five-part series on the key stages of the RAAF: The Early Years – 1914 to 1939 (World War One and the interwar years), World War Two: 1939 to 1945, the Cold War begins and the Korean War: 1945 to 1953, South East Asian Conflicts – 1950 to 1972, Peacekeeping and Modern Conflicts – 1973 to 2014 and finally The Future (the re-equipping of the RAAF).
Lets now take a look at the turbulent years of World War Two, especially when Australia’s back was to the wall in 1942. Japan was on the attack with Australia in its sights. Bombs fell all over northern Australia and Japanese submarines prowled and attacked our shores. Against all odds RAAF airmen fought back and made sure the skies over Australia and the West Pacific were secure.
PRELUDE TO WAR
![]() Australian air men of the Australian Flying Corps (AFC) were blooded in the skies over the battlefields of World War One (1914-1918) in Europe and the Middle East. These men proved themselves to be a valuable asset to the nation, but following the war the Royal Australian Air Force (the AFC was redesignated the Australian Air Corps in 1920 and the RAAF in 1921) experienced major downsizing for peacetime operation.
Australian air men of the Australian Flying Corps (AFC) were blooded in the skies over the battlefields of World War One (1914-1918) in Europe and the Middle East. These men proved themselves to be a valuable asset to the nation, but following the war the Royal Australian Air Force (the AFC was redesignated the Australian Air Corps in 1920 and the RAAF in 1921) experienced major downsizing for peacetime operation.
Although the inter-war period left the Royal Australian Air Force with highly qualified personnel, they were unfortunately relatively few in number (12 Squadrons, 310 officers and 3,179 servicemen) and were armed with a fairly weak and ineffective fighting air force that lacked modern bombers and fighters. The majority of combat aircraft in service were obsolete when war reared its ugly head again with the commencement of World War Two in Europe on September 1st, 1939.
The aircraft industry had not yet fully emerged in Australia to build a significant number of modern combat aircraft and the supply of aircraft from Britain was not possible as they needed aircraft to combat the German Luftwaffe. Local aircraft design and production had started with the locally built CAC Wirraway trainer and utility aircraft but this was not the combat aircraft that was required. This left the RAAF to soldier on at home with the combat aircraft available in its inventory such as the Bristol Bulldog and Hawker Demon biplanes until newer aircraft could be purchased and manufactured.
WORLD WAR TWO
With the outbreak of war, the Australian government was quick to leap to the aid of Britain and her European allies providing men and equipment of the Second Australian Imperial Force (AIF) for Europe and the Middle Eastern theatre of war. The RAAF had intended to send an Air Expeditionary Force to Europe consisting of 2 bomber squadrons and 2 fighter squadrons but with a lack of suitable aircraft it was decided that manpower was going to be the best solution.

Australia along with other Commonwealth nations joined the Empire Air Training Scheme (EATS) to train a vast number of pilots and aircrew that could fly within the RAF and RAAF (the target of the scheme was to provide 50,000 trained aircrew per year). The Air Expeditionary Force concept was abandoned, but No. 10 Squadron RAAF was formed in Britain with Australian personnel already there and they were equipped with Short Sunderland flying boats that flew under the command of the RAF. In 1940 No. 3 Squadron and No. 1 Air Ambulance Unit were sent to the Middle East. All other assets were focused on the EATS.

Empire Air Training Scheme
Empire Air Training Scheme bases were set up around Australia to train the vast number of men required. The Avro Anson was an integral air crew training aircraft for pilots, observers, radio operators and navigators in EATS. Flight training would include air navigation and armaments training (gunnery and bombing training). The Anson was in production from 1935 to 1952 and over 11,000 were built (it was originally developed as general reconnaissance bomber). 1,025 were operated by the RAAF (the first 48 were delivered in 1936, an additional 40 were chartered from Great Britain between 1938 and 1939 – retaining RAF serial numbers, and finally 937 Anson Mk.1’s were delivered between 1940-1944) making it the most prolific aircraft type in the RAAF.

The Anson was not only used for training though and also served the RAAF as a maritime patrol and liaison aircraft (the last one was retired in 1955). “Faithful Annie” served with No. 2, 4, 21, 22 and 23 Squadrons on maritime patrol duties until 1940 (replaced by the Lockheed Hudson) and then flew with over 40 training units! Some of the Anson’s that were delivered between 1940 and 1944 were fitted with search radar and returned to the maritime patrol role along Australia’s east coast flying No. 66, 67, 71 and 73 Squadrons.
By late 1940 the first EATS graduates were arriving in Britain. 17 RAAF squadrons were formed from EATS for service in Europe and the Middle East. 8 of these squadrons flew bombers under the control of RAF Bomber Command on missions over Germany and Italy (almost 3,500 RAAF servicemen were killed in action serving in the Bomber Command. A further 1,500 became Prisoners Of War when they had to bail out over enemy territory). Others flew fighters, ground attack aircraft, torpedo bombers, flying boats and transports in missions over Britain, France, Libya, Malta, Syria, Italy, Northern Russia, Norway and the Atlantic Ocean. RAAF aircrews served in these theatres right up until the end of the war in 1945 (although in 1942 two of the fighter squadrons formed were returned to Australia).

When the Empire Air Training Scheme ceased in late 1944 over 37,000 aircrew had received elementary and advanced trained in Australia (10,000 of these trainees received their final advanced training in Canada and 674 others were trained in Rhodesia). Most Australians trained under the scheme served as pilots, engineers, navigators, wireless operators, observers and air gunners. A smaller number served in ground crew roles such as mechanics and administrative roles.

To alleviate some of the resource issues and free up more men to fight in the war, the Womens Australian Auxilliary Air Force (WAAAF) was formed in March 1941 (after significant lobbying from women and about a year of government debate!). The women who served in the WAAAF were not in combat roles or aircrew but fulfilled important roles such as being mechanics, instrument repairs, weapons maintenance, radar operators, signallers, electricians, parachute packing and drivers. Where ever they were needed the 27,200 women who served in the WAAAF provided their valuable skills. The WAAAF was disbanded in December 1947.

In addition to EATS was the Air Training Corps (ATC) for youths aged 16-18 (cadets). The ATC was established on June 11th, 1941 and the participants were taken up in various training aircraft to learn the basics of flight. The ATC was an invaluable lead in training program for potential aircrews.

Sending so many servicemen overseas to fight, left Australia poorly defended. At the time it probably wasn’t much of an issue until December 1941 when things drastically changed with the entry of Japan into the war. The Pacific campaign was now right on Australia’s doorstep and by 1942 the nation was soon under direct attack and threatened with a Japanese invasion!
Japan Attacks
On December 8th, 1941 (Australian date) Japan simultaneously launched their devastating attacks on British Malaya and the US naval and air bases of Pearl Harbour in Hawaii. War was then declared upon Imperial Japan by the British Commonwealth (including Australia) and also brought the USA directly into World War Two.

The RAAF had 3 squadrons and an Empire Air Training Scheme squadron sent from Britain based in Malaya and Singapore at the time. RAAF No. 21 and 453 Squadrons were equipped with the Brewster F2A Buffalo, a stubby, underpowered and unfortunately obsolete fighter that had been transferred from Britain for use by the RAF, RAAF and RNZAF in the Pacific theatre as they were found unsuitable for the European theatre (67 F2A entered RAAF service in 1941. These F2A retained their original RAF serial numbers). The Buffalo was also operated in the region by the Dutch Netherlands East Indies (NEI) Air Force (see the emergency fighter section below).

Bomber support was provided by RAAF No. 1 and 8 Squadrons (No.1 was the same squadron I wrote about from World War One and the first RAAF squadron to fly combat missions in the Pacific theatre) which were equipped with 33 Lockheed Hudson light bombers (16 with No. 1 Squadron and 17 with No. 8 Squadron). These aircraft conducted the first RAAF retaliatory actions against the Japanese during their opening attack on Malaya on December 8th, 1941.

The Hudson general reconnaissance bomber was in RAAF service from 1940 to 1948/49 and they operated 267 of the type, including the Mk. I, II, III and IV variants. In the Pacific theatre they were operated by No. 1, 2, 6, 7, 8, 13, 14, 23, 24, 25, 32 and 38 Squadrons, along with four communications units and a special transport flight. RAAF No. 459 Squadron served in the Middle East flying RAF serialed Hudson bombers. As more of the Bristol Beaufort bomber came into service in 1943 (see below) the Hudson was mainly relegated to communication and training roles but in those early months of the war they manage to inflict valuable and effective damage upon Japanese shipping and landing forces.

These RAAF aircraft in Malaya and Singapore were outnumbered, under gunned and certainly no match for the superior Japanese fighters of 1941-1942 such as the Nakajima Ki-43 Hayabusa “Oscar” or the Mitsubishi A6M Zero, but they were all we had to help stop the Japanese advance at the time. The pilots of these squadrons knew they were up against it and stood little chance but they threw in their all and their deeds of bravery will never be forgotten.
The first RAAF airmen lost to the Japanese occurred on the December 8th attack on Malaya when 2 Lockheed Hudson bombers of No. 1 Squadron were shot down during an attack on a Japanese navy cruiser (during the raid a Japanese transport was destroyed and another 2 were badly damaged by the 7 aircraft dispatched by the squadron). Flying Officer John Dowie, the lone survivor of the two crews became Australia’s first Japanese held Prisoner of War.

By the end of March 1942, 32 of the original 33 Lockheed Hudson bombers deployed to Malaya had been lost! The squadrons in Malaya had also been reinforced from Australia with 5 Hudson bombers in December 1941 and 4 more in January 1942, all of which were also lost in action!

Around 22 of the RAAF Brewster Buffalo fighters were lost to enemy action, 19 were written off in accidents, 4 were captured by the Japanese and the rest were taken off RAAF charge by March 1942 (they had to be relocated to the NEI then were shipped back to Fremantle, WA). Victories for the Buffalo were few – on December 13th, 1941 F/L R.D. Vanderfield of No. 453 Squadron shot down 2 Japanese bombers (possibly Kawasaki Ki-48 Lily light bombers of the Imperial Japanese Army); and on January 17th, 1942 RAAF Sgt A.W.B. Clare of No. 453 Squadron shot down an Imperial Japanese Army Nakajima Ki-27 “Nate” and a Nakajima Ki-43 Hayabusa “Oscar” fighter of the 64 Sentai near Muar River in Malaya.

A joint RAF/RAAF Operation Training Unit was also established in Malaya on January 10th, 1942 with 10 CAC Wirraway aircraft formerly from No. 21 Squadron. It was known as Y Squadron and only 4 of these aircraft survived to return to Australia!
The Malayan Campaign ended in Japanese victory and lasted from December 8th, 1941 to January 31st, 1942. In early 1942 the so-called Fortress of Singapore fell quickly to the Japanese (the Battle of Singapore lasted from just February 8th to February 15th, 1942) and then the Netherlands East Indies (NEI – todays Indonesia) soon followed (parts of the NEI were first invaded on December 15th, 1941 with the Dutch surrendering on March 9th, 1942). Most of the men of the Australian 8th division were captured or killed in these campaigns. The other 3 divisions of the Second AIF were in North Africa and the Middle East. New Guinea was soon under invasion and Australia was wide open for Japanese attack.

RAAF Roundel Changes
In the early years of World War Two all RAAF aircraft had the standard red, white and blue roundel that was the same as the RAF (sometimes an additional outer yellow circle was added). This all changed though when a No. 11 Squadron PBY Catalina flying boat was mistaken for a Japanese aircraft by a US Navy Wildcat fighter. The red dot was promptly removed! After the war it was reintroduced and remained on RAAF aircraft until 1956 when the famous Kangaroo roundel was implemented.
The Wirraway – An Unlikely Hero
The CAC Wirraway was a locally developed aircraft produced by the Commonwealth Aircraft Corporation in Fishermens Bend, Victoria. It was intended as a trainer and general purpose aircraft derived from the North American Harvard / T-6 Texan but also ended up being used by the RAAF in combat roles and as a squadron “hack” aircraft.

The Wirraway used the same 600hp Pratt & Whitney R-1340 Wasp 9 cylinder air-cooled radial engine at the T-6 Texan but had a number of key design differences including a D shaped tail, a revised tailplane, a revised wing with more rounded wingtips, a larger air intake under the radial engine, two forward firing 0.303 in (7.62 mm) Vickers Mk.V machine guns synchronized to fire through the propeller arc and a single 0.303 Vickers Mk.I machine gun mounted in the rear cockpit and a strengthened airframe structure with underwing bomb racks to allow for dive bombing. They were manufactured from 1939 to 1946 with 755 produced (the last remained in service until 1959). Primarily operated by No. 4, 5, 12, 14, 21, 22, 24, 25, 54, 60, 78, 82, 85 and 87 Squadrons, there was also generally a Wirraway on hand with most RAAF squadron for general purpose duties.
The CAC Wirraway became an important aircraft to the war effort and was integral to Australia’s contribution to the Empire Air Training Scheme (EATS) which trained thousands of pilots and aircrew in Australia and other Commonwealth Nations. The Wirraway was never intended to be a combat aircraft, but in the early fighting in New Guinea some Wirraway’s actually had to be thrown into combat with Japanese aircraft as an emergency fighter and others were used to attack Japanese troops simply due to a lack of any other option.

The Wirraway pilots were incredibly brave going up against a foe flying far superior aircraft like the Mitsubishi A6M Zero which had a top speed of 533 kph / 331 mph and a much heavier armament of 2 x 20 mm cannons and 2 x 7.7 mm machineguns. A total mismatch against the Wirraway top speed of just 354 kph / 220 mph and very light armament of 2 x .303 machine guns in the nose and one in a rear gunner position!

On January 6th, 1942 the first air combat between Australia and Japan involved Wirraways intercepting Japanese seaplanes over New Britain, no aircraft were shot down in this incident. Two weeks later just 8 Wirraways had to be thrown into combat against more than 100 Japanese aircraft attacking Rabaul in New Guinea, sadly only 2 of the Wirraways survived unscathed and none were able to shoot down a Japanese aircraft. This changed on December 26th, 1942 though when an RAAF Wirraway from No. 4 Squadron on a reconnaissance mission near Buna, flown by Pilot Officer John S. Archer from Melbourne dived upon what was reported as a Mitsubishi A6M Zero 1,000 feet below. Against all odds he shot a long burst of fire from his machines guns sending the Zero into the sea!
Archer had claimed the prized scalp of the far superior Japanese fighter. A post war investigation revealed that the aircraft shot down was actually a Nakajima Ki-43-II Hayabusa ( Oscar) of the Imperial Japanese Army Air Force 11th Sentai, rather than an Imperial Japanese Navy Mitsubishi A6M2 Zero. The mistake is understandable as back then everything was probably reported as a Zero!

Archer achieved the only known air to air victory in a Wirraway. He later said he just acted on impulse and was lucky to get a good shot in first. For his act of bravery he was awarded the Silver Star by none less than General Douglas MacArthur, Allied Supreme Commander of the Southwest Pacific Area!
Due to its historical significance the Wirraway flown by Archer (A20-103) is today displayed at the Australian War Memorial to preserve it for future generations to learn about the important role it played in World War Two. The aircraft itself has been well restored and maintained but it is displayed in a small area with a very low ceiling, so currently has one wing removed and does not stand on its undercarriage.

Australia Bombed
Australia was now firmly in the sights of Japan. From mid February 1942 famous Japanese Navy pilot Nobuo Fujita flew reconnaissance missions over Australian east coast harbours launched from the long-range I-25 submarine. The I-25 was one of the largest submarines in the Japanese fleet and carried a stowable Yokosuka E14Y1 “Glen” seaplane which could be disassembled and stored in a special on deck hangar in front of the sub’s conning tower. The first flight on February 17th, 1942 was over Sydney to scout out an airbase, then on February 26th he took off over Melbourne’s Port Phillip Bay and finally over Hobart in Tasmania on March 1st.
Fujita was onboard the same submarine that participated in patrols to defend the fleet that attacked Pearl Harbour (an issue with the aircraft meant he could not fly any missions over Hawaii) and he would also fly similar missions over New Zealand in March 1942 and even dropped incendiary bombs from the same aircraft on Oregon in the USA in September 1942. This bombing raid was an attempt to start a forest fire (and was the only direct strike by a Japanese aircraft on the US mainland (all other attacks were on US islands in the Pacific).

Fujita had quite an amazing career and survived the war to live to the ripe old age of 85. His exploits also highlighted how poorly defended Australian airspace in rear areas truly was – his aircraft was never intercepted or even fired upon!
Only 10 weeks after the rapid Japanese invasion of South East Asia the Australian mainland was under direct attack by Japanese forces. Between February 1942 and November 1943 Japanese aircraft attacked targets in the north of mainland Australia (Northern Territory, Western Australia and Queensland) along with nearby shipping and islands at least 97 times.
The first and worst attack was on the city of Darwin on February 19th, 1942. A total of 242 Japanese fighters and bombers from aircraft carriers (including 4 used in the attack on Pearl Harbour that were eventually all destroyed in the 1942 Battle of Midway) and land bases in the Dutch East Indies attacked military and civilian targets in two raids that day.

The first two Japanese raids on Darwin were very effective killing at least 235 to 250 people (military and civilian), wounding up to 400 others, destroying 20 aircraft on the ground along with sinking three warships and seven merchant vessels; damaged ten other ships and caused extensive collateral property damage. The attacks caused chaos in Darwin and at the time the size of the attack was covered up by the Australian Government as much as possible to avoid mass public panic across the nation!

Another serious Japanese attack occurred at 9:20am on March 3rd, 1942 against the Western Australian coastal town of Broome which had become a major destination for Allied forces and Dutch refugees who escaped the Japanese invasion of the Netherlands East Indies. Long range Japanese Mitsubishi Zero fighters strafed the town and airfield killing at least 70 people (military and civilian) and destroying 23 aircraft including 16 flying boats moored in the bay and 7 Allied aircraft (1 RAAF Lockheed Hudson, 5 USAAF/Dutch bombers and a Dutch cargo aircraft) at the Broome aerodrome (1 of the USAAF aircraft was destroyed trying to take off). Many of the Dutch refugees who died were inside the flying boats at the time. Broome was attacked by the Japanese 3 more times in the next 18 months but the March 3rd, 1942 raid was the worst attack.

On May 31st, 1942 an attack force of 3 Japanese midget submarines entered Sydney Harbour in New South Wales (they were launched from larger submarines off the coast). The attack was not overly successful but heightened the fears of invasion. The Japanese only managed to sink one ship – HMAS Kuttabul a barracks ship was hit after they missed USS Chicago (a US Navy cruiser). 21 navy personnel died aboard HMAS Kuttabul. All the enemy subs were lost during and after the attack. The submarine attack on Sydney Harbour and further attacks on shipping along the east coast of Australia by the larger submarines that launched the midget subs highlighted the need for better defences around Australia.

Following these air raids and submarine attacks, air attacks occurred all over the north of Australia until November 12th, 1943. It was not until September 1943 that Australian Prime Minister John Curtin announced to his cabinet the danger of Japanese invasion had finally passed. By that stage of the war the Japanese advance had been stopped in New Guinea.
Emergency Fighters
With Japan attempting to capture New Guinea and Australian home soil under air attack more fighters were required to defend Australian air space. Unfortunately modern fighters were still in short supply (at that time the war in Europe prevented sufficient supply of new aircraft from Great Britain and the United States) and some of the best fighters available were aircraft that were supplied in 1942 to the RAAF as an emergency measure to counter Japanese attacks.
These emergency fighters included an additional 17 of the obsolete Brewster F2A Buffalo fighter. These ex-Netherlands East Indies (NEI) Air Force Buffalo fighters were delivered between June and October 1942. The were operated in the air defence and photo-reconnaissance role by No. 24, 25, 85, and 87 Squadrons until 1943 when the 13 surviving airframes were transferred to the USAAF (4 had been written off in miscellaneous incidents).


A small number of ill-suited Bell P-39 Airacobra fighters were also loaned to the RAAF from the USAAF. 7 x P-39F were delivered to RAAF Bankstown near Sydney in July 1942. These were followed by 7 x P-39D in August 1942 for RAAF use near Brisbane in Queensland. 9 other P-39D & F models were received as replacements for crashed aircraft and as additional aircraft (at least 4 of these did not enter service).

The P-39’s were allocated to No. 23, 24, 82 and 83 Squadrons. These aircraft were still no match for the superior Japanese fighters of 1941-1942 and the performance of the P-39 was better suited to lower altitudes which was not ideal for intercepting enemy bombers, but they were the best available at that time of need to fill the air defence void and had to soldier on until more capable fighters were available. All of the P-39’s were returned to the USAAF by November 1943.
The Boomerang
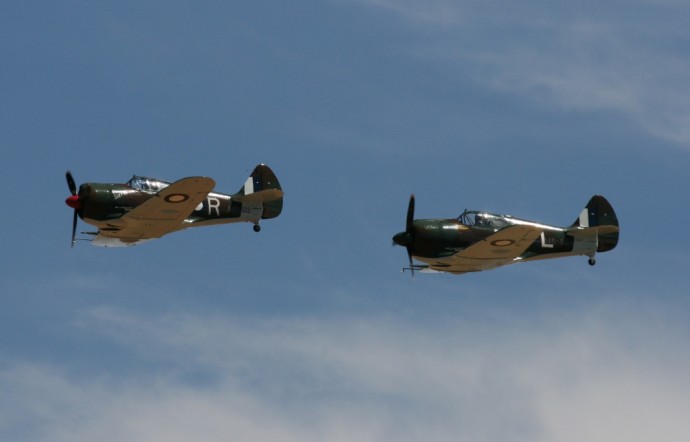
The emergency fighters were fine to fill a void in the rear areas of Australia, but the RAAF desperately needed modern aircraft to combat the Japanese on the frontline. Unfortunately in 1942 these types of assets were tied up in the fighting in Europe and the Middle East. It would take some time for new aircraft to be shipped from overseas or produced locally under licence. To make up the shortfall the Australian Government funded the development of a home-grown fighter. The Commonwealth Aircraft Corporation (CAC) Boomerang was the outcome. The CAC Wirraway was actually the starting point for development of the CAC Boomerang design (note the similar shaped wings).

The CAC Boomerang was the first combat aircraft to ever be designed and built in Australia (a lot of hurdles had to be overcome to achieve this). Ordered into production on February 2nd, 1942 the first flight occurred incredibly, just a few months later on May 29th, 1942.
Given no fighters were in production in Australia during those early war years, high performance aircraft engines were simply not locally available. A solution needed to be found to put in the Boomerang. There was really only one viable option. Bristol Beaufort torpedo bombers were now being manufactured locally and the Pratt & Whitney Twin Wasp radial engine used in the bomber was deemed suitable for the Boomerang (the same engine was used in the Grumman Wildcat operated by the US Navy).
The Boomerang was in production from 1942 to 1945 with 250 being manufactured. The first examples entered RAAF service with No. 2 Operational Conversion Unit (2 OCU) on October 19th, 1942 and the first operational fighters were issued to Number 83 Squadron on April 10th, 1943 to replace the Bell P-39 Airacobra “emergency fighter” on home defence duties (Number 84 and 85 Squadrons soon followed – the latter was flying obsolete Brewster Buffalo fighters).

The first combat test for a CAC Boomerang was on May 20th, 1943 when a Number 85 Squadron aircraft flown by Flight Lieutenant Roy Goon was scrambled to intercept Japanese bombers off Exmouth, Western Australia. Spotting the fighter, the Japanese dropped their bombs wide of their intended target and flew away before he could engage them!
Japanese air raids continued along the north of Australia and Boomerangs were deployed for air defence but unfortunately the top speed of the Boomerang at only 490 kph / 305 mph and poor high altitude performance was inadequate against Japanese aircraft, especially faster fighters such as the Mitsubishi A6M Zero and Nakajima Ki-43 Oscar. Ultimately they could head off an enemy and deter their attack but not pursue and shoot the enemy down.

Although soon replaced in the fighter role by more capable aircraft such as the Curtiss P-40 Kittyhawk and Supermarine Spitfire, these performance issues were not the end of the Boomerang though. With its twin 20mm cannons and 4 x .303 machine guns this little fighter could still pack a mean punch. Firepower accompanied with ruggedness and heavy armour plating protecting the pilot along with good maneuverability and performance at low altitude resulted in the Boomerang being very suitable for low-level close support missions in places such as New Guinea and Borneo. The Boomerang then assumed this new army co-operation role with No. 4 & 5 Squadrons with great respect from the troops down below.

Luckily today a number of CAC Boomerang airframes survive and are on display in various museums in Australia. 2 continue to fly and in 2009 I was at an air show in Temora, NSW where they flew together (one had recently been restored). This would have been the first time two Boomerangs had flown together since 1945.
The CAC Boomerang is a very unique part of Australian aviation history. It is my understanding that further airframes are being restored to flying condition which is great to hear and fantastic for the Australian warbird scene.

The RAAF Rebuilds
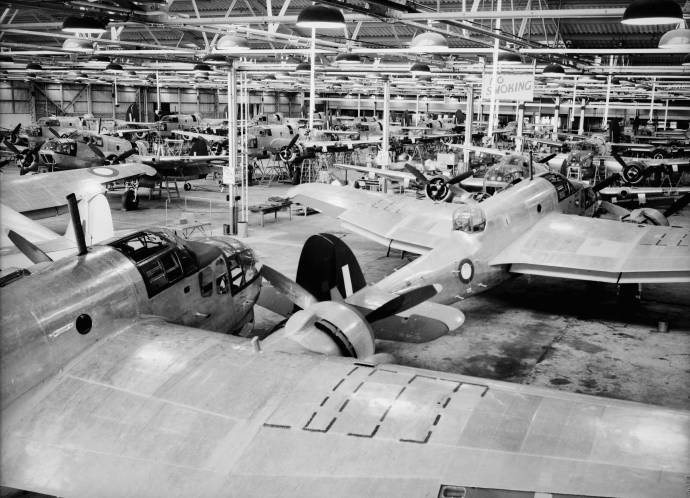
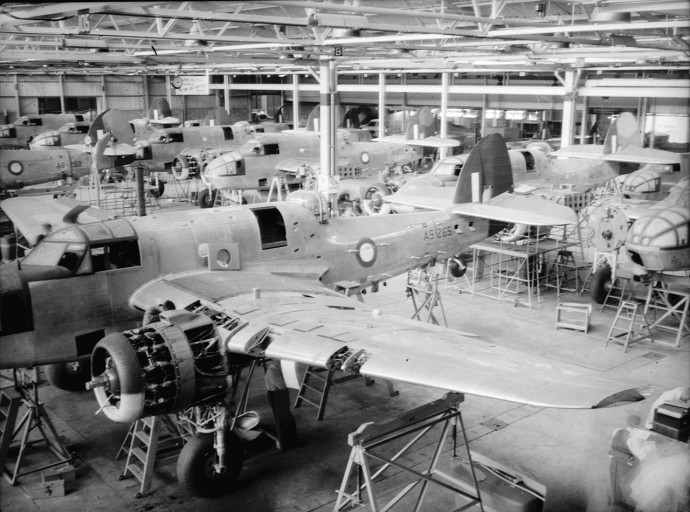
Despite early setbacks the RAAF soon re-equipped with numerous modern combat aircraft and became a formidable foe. In mid-1939 the Australian aviation industry barely existed, but with the outbreak of war it ramped up in its time of need and government aircraft factories known as the Department of Aircraft Production (DAP) at places like Fishermans Bend in Melbourne started to mass produce airframes and engines to help rebuild the RAAF and take on the Japanese in force. Initially production focused on the Bristol Beaufort torpedo bomber, of which 700 were built from 1941-1944 and later the Bristol/DAP Beaufighter of which 364 were built between 1944-1945.
New Fighters
Deliveries of new aircraft from the USA and Great Britain started to arrive in 1942 to supplement local production. From March 1942 onwards the RAAF started flying aircraft such as the highly capable Curtiss P-40 Kittyhawk. The P-40 ultimately made the most significant operational impact of any RAAF aircraft in the defence of Australia and in the fighting over New Guinea. The P-40 was the reliable workhorse of the RAAF serving as an interceptor and fighter-bomber and it was available in large numbers.

The P-40 had a good performance, was rugged and well armed with 6 x 0.50 caliber machine guns and it could carry bombs too. Eventually 848 P-40’s were operated by the RAAF (163 P-40E, 42 P-40K, 90 P-40 M and 553 P-40N models) serving in the Middle East and Italy with No. 3 & 450 Squadrons, and the South-West Pacific with No. 75, 76, 77, 78, 80, 82, 84, and 86 Squadrons. Following its great contribution, the last RAAF P-40 was retired in 1947.

No. 75 Squadron had an interesting baptism of fire flying the Curtiss P-40 Kittyhawk. The squadron was formed in early March 1942 and less than 3 weeks later was sent to defend Port Moresby in New Guinea. The city had been under regular Japanese air attack since February 1942 but they were soon to get some of their own medicine at the hands of the RAAF. On the first day of arrival (March 21st, 1942) with just four aircraft available the squadron shot down a Japanese bomber on a reconnaissance mission over Port Moresby (the first victory for the squadron). On the very next day the full squadron launched their own attack against the Japanese air base at Lae. Despite being up against superior numbers the Kittyhawks struck them hard destroying 12 Japanese aircraft on the ground and damaging 5 more.

For 6 weeks No. 75 Squadron was the only fighter squadron operating in the defence of Port Moresby. It was not until the end of April 1942 that the USAAF started to arrive with Bell P-39 Airacobras to provide some well needed support. By then the squadron had destroyed 39 Japanese aircraft and damaged 54 more for the loss of 24 aircraft and just 12 pilots. Even though the RAAF losses were relatively low, at that stage of the war they didn’t have too many P-40’s to throw around and when the squadron returned to Australia to regroup in early May 1942, just 2 serviceable aircraft went with them. In July 1942 they returned to New Guinea to successfully defend Milne Bay from a Japanese invasion of the base alongside No. 76 Squadron which also flew the P-40. No. 75 Squadron continued to fly the P-40 in offensive operations in the campaign to push Japan out of the West Pacific right up to the end of the war in 1945.

Enter the Spitfire
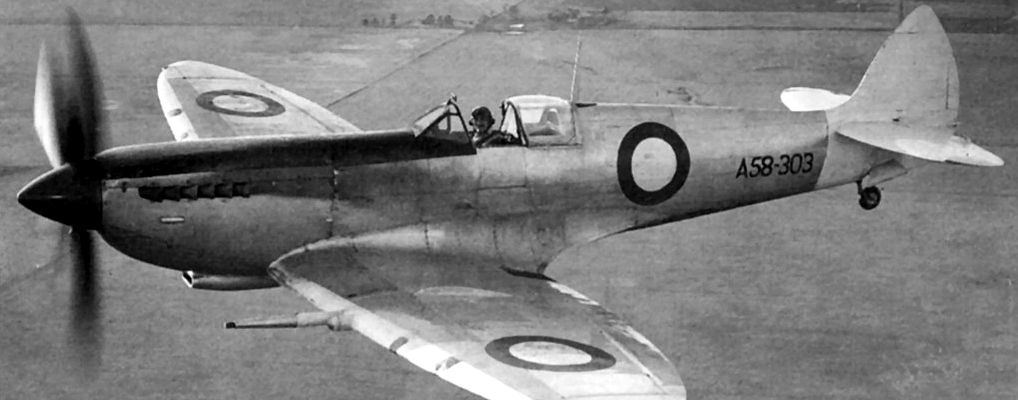
The Supermarine Spitfire began to enter RAAF service in August 1942 and by June 1945 656 had been delivered to the RAAF (245 Mk.Vc’s A58-1/185 and A58-200/259, 251 Mk.VIII’s A58-300/550, 159 HF Mk. VIIIs A58-600/758 and 1 Mk.Vc EE731 which did not receive an A58 number). With the Curtiss P-40 Kittyhawk the Spitfire was the main fighter aircraft of the RAAF until 1945.

The Spitfire was operated by RAAF No. 79, 85, 452 and 457 Squadrons in the South West Pacific theatre and RAAF No. 450 and 453 Squadrons in Europe and the Middle East (No. 452 and 457 Squadrons also operated in Europe and the Middle East earlier in the war). RAAF pilots also flew Spitfires in Royal Air Force (RAF) squadrons in Europe, the Middle East and Burma. The last Spitfire was retired from RAAF service in 1952 but disposal commenced in 1946.
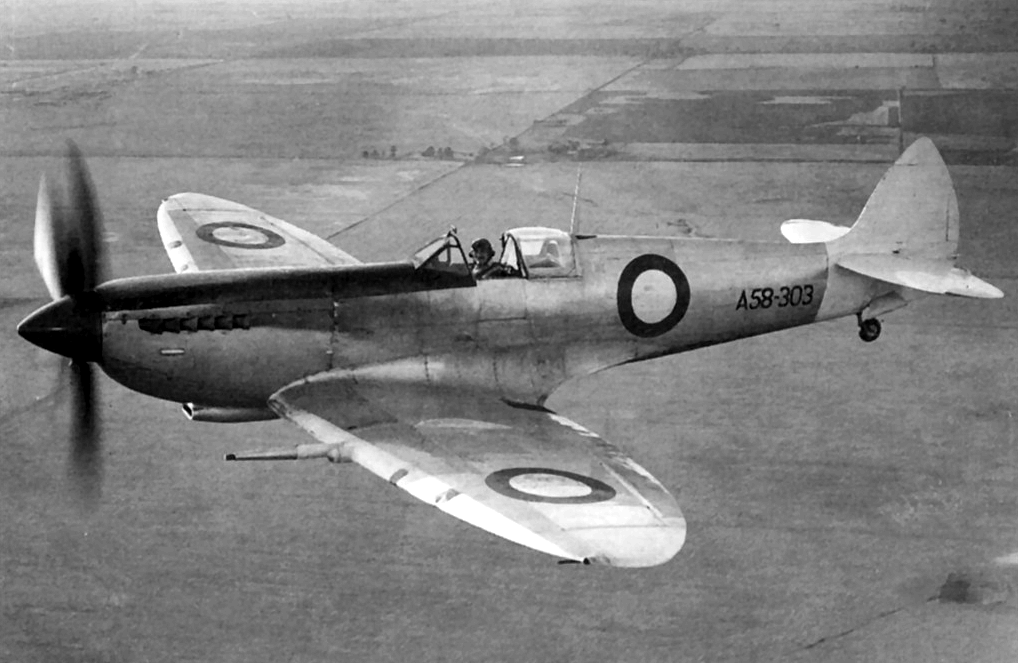
The Spitfire came with a legendary status being well-known for its success against the German Luftwaffe in the Battle of Britain in 1940 and onwards but it really wasn’t that well suited for the required role in Northern Australia and the South West Pacific. This was due to its relatively short-range and mechanical issues resulting from rough dusty operational conditions faced in forward dirt airstrips and the like (the tropical filter was a common feature on RAAF Spitfires) and also it’s rather fragile and closely set undercarriage didn’t like those types of conditions either. Despite these drawbacks, from a morale point of view and its excellent performance as a fighter in the air, the Spitfire still made its impact in the RAAF and against the enemy.

At 2:30pm on March 2nd, 1943 a Japanese force of 15 Nakajima B5N Kate bombers and their Mitsubishi A6M Zero fighter escorts got a rather rude shock when they planned to attack Coomalie airfield south of Darwin in the Northern Territory. Unbeknownst to them No. 1 Fighter Wing made up of RAF No. 54 Squadron and RAAF No. 452 and 457 Squadrons had been re-equipped with Mk.Vc Spitfires and was ready for action (the squadrons had arrived in Australia in August 1942 but without their aircraft which following training did not start to arrive in the region until January 1943).
The Spitfires intercepted the Japanese aircraft and in their first fight over Australian soil they accounted for 2 Zeros and a Kate bomber destroyed and another damaged all in the space of 8 minutes for no loss of their own. This was a great propaganda moment to boost the morale of the Australian people and 2 days later Prime Minister John Curtin publicly announced that Spitfires were now operation in the South-West Pacific theatre, but of course the message had to be boosted a bit so the tally was exaggerated to 6 Japanese aircraft being shot down. Either way the Spitfire made its mark in Australia.

One RAAF pilot flying Spitfires in Europe, Flight Lieutenant Daniel Reid DFC, scored a unique victory by closing in to a range of just 100 yards to shoot down a German Arado Ar 234 “Blitz“ (the first operational jet bomber) on March 2nd, 1945 near Enschede, Holland whilst flying an RAF No. 41 Squadron Spitfire Mk.VIV. This was one of very few Ar 234’s shot down.
The Mustang
Later in the war the long-range Commonwealth Aircraft Factory (CAC) CA-18 Mustang began to enter RAAF service. Initially in November 1944 RAF North American P-51D Mustangs were flown by RAAF No. 3 Squadron in Italy, then production of approximately 200 Mustangs began in Australia. The Australian built Mustangs began entering service in 1945 but they were too late to see combat during World War Two. A further 298 lend-lease North American P-51D & P-51K Mustangs (214 D and 84 K models) from the United States were also received in 1945.


RAAF Mustangs were used to occupy Japan (1946-1949/50) serving with No. 76, 77 and 82 Squadrons in Iwakuni (No. 76 and 82 Squadrons returned to Australia in 1949). When the Korean War started in 1950, RAAF Mustangs flying with No. 77 Squadron were deployed from Japan to participate in the conflict (some of the first UN air assets to be deployed). In the post Korean War era the Mustangs were flying with Citizen’s Air Force Squadrons and the last was retired in 1959.
Ground Attack, Close Support and the Big Bombers
RAAF fighters were backed up by ground attack and close support aircraft like the formerly mentioned CAC Boomerang and the Bristol Beaufighter known as “Whispering Death” to the Japanese due to its quiet engines (well so the tale goes. This may well have just been propaganda at the time). These deadly aircraft were used to great effect in attacking the enemy and proved very destructive against Japanese shipping. British built aircraft entered RAAF service in 1942 but by early 1944 production by the Department of Aircraft Production (DAP) had started in Australia with the last of 364 being completed by the end of 1945 (the first DAP example flew on May 26th, 1944). The Beaufighter served with No. 22, 30, 31, 92 and 93 Squadrons and the last was retired by the RAAF in 1957.

The high-speed “Wooden Wonder” the De Havilland DH 98 Mosquito also served with the RAAF as a fighter-bomber and photo-reconnaissance aircraft. Production of 212 Mosquitos commenced in Australia in 1942 with the first DHA 98 FB Mk.40 entering service in 1943. 34 of these were converted to PR Mk.40/41 photo-reconnaissance variants. A further 76 British built Mosquitos also served with the RAAF. By the time the Mosquito entered service until the end of the war they played a limited but important role in the battles that Australia was involved in. The Mosquito was flown by No. 1 Photo Reconnaissance Unit, No. 87 and 94 Squadrons, No. 78 Wing, No. 1 Aircraft Performance Unit, the Aircraft Research and Development Unit (ARDU), the Central Flying School, No. 5 Operational Training Unit and Ferry/Survey Flights. The photo-reconnaissance variant continued on in service until 1954 (most were sent for disposal with a few transferred to the RNZAF) and was used for surveying the vast land mass of Australia between 1947 and 1953.

These attack aircraft were complemented with various bombers such as the Avro Lancaster (operated in Europe as part of RAF Bomber Command), Consolidated B-24 Liberator, Douglas A-20 Boston (a total of 69 were operated 1942-1945) and Bristol Beaufort (torpedo / reconnaissance bomber – 700 were produced by DAP from 1941 to 1944). The bombers were supported by maritime patrol/Search and Rescue aircraft including the PBY Catalina (168 were delivered between 1941-1945 and they roamed far and wide from secret flying boat bases and conducted some amazing long-range operations from Darwin and Morotai such as the mining of Hong Kong harbor in 1944). Transport and Liaison squadrons kept these aircraft and men supplied around the globe flying aircraft such as the ever reliable Douglas C-47 Dakota. The RAAF could now take on any enemy with the best equipment available and come out on top.

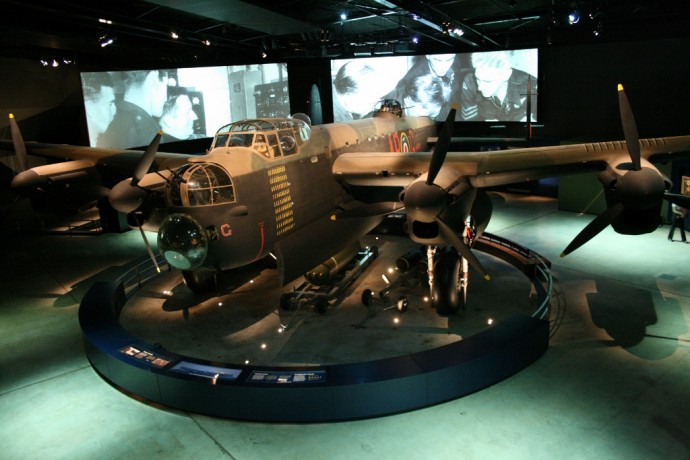


The first RAAF B-24 became operational for use against Japanese forces in February 1944 and went on to prove to be very effective in the heavy bombing role in places such as Borneo. 287 Consolidated B-24 Liberators (B-24D, B-24J, B-24L and the B-24M models) served in RAAF No. 12, 21, 23, 24, 25, 99 and 102 squadrons (the last Liberator was retired from RAAF service in 1948). Most RAAF B-24 crews were trained at the No. 7 Operational Training Unit in Tocumwal, NSW. The Liberator was the only heavy bomber used in the Pacific by the RAAF and they operated from the Northern Territory, Western Australia, Morotai in the Netherlands East Indies and Palawan in the Philippines. In the latter stages of the Pacific War, RAAF Number 200 and 210 flights also used small numbers of B-24′s for special covert and electronic surveillance missions (under the direction of the Australian Intelligence Bureau). These special missions were conducted in 1945 over Borneo and the Netherlands East Indies and included dropping “Z-Force” special forces behind enemy lines.


These are just some of the various aircraft types that the RAAF operated. They flew in far and wide theatres of war from Europe, to North Africa, the Middle East, Asia and the South-West Pacific including the air defence of Australia and New Guinea. They were the backbone of the RAAF and helped the Allied cause to push the Axis powers to defeat. The pilots, crews and RAAF servicemen and women on the ground did their bit to win the war. Some of these pilots became aces (5 or more air to air victories) and were the face of the RAAF when they became national heroes.
Morotai Mutiny
As the war progressed and particularly as the Japanese were on the retreat, the US started to take on the main role in the air war. By early 1945 Japanese air opposition was more or less non-existent and Australian airmen became frustrated as their role changed to being one of “mop up duties” attacking secondary ground targets on islands that had been bypassed by allied forces as the Japanese were pushed out of the West Pacific region. Morale was ebbing and this soon caused some issues within the ranks.
In April 1945 these factors resulted in the “Morotai Mutiny“ where senior pilots including Wing Commanders and Squadron Leaders of the Australian First Tactical Air Force based on Morotai island in the Netherlands East Indies felt they were risking their lives for very little gain in the war effort (the RAAF losses versus results did not justify the actions taken) and 8 of them offered their resignations (they were flying Spitfires in ground attack missions that the aircraft was not well suited for). The matter was handled very poorly by the Chief of the Air Staff, Air Vice-Marshal George Jones who wanted to discipline the pilots including our greatest World War Two air ace Clive Caldwell. Even the top air ace of the Australian Flying Corps in World War One, Air Commodore Harry Cobby who was the commander of the Australian First Tactical Air Force was relieved of his post over this incident for failure to maintain proper command over his men!

A government enquiry was instigated over the “mutiny” and Judge Barry found that the pilots motivation for resignation were sincere and ultimately none of the pilots were court martialed over the incident. Most of them continued flying in the RAAF until the war was over. Caldwell and fellow air ace Wing Commander Bobby Gibbes were court martialed but this was over their involvement in alcohol trafficking to US servicemen on Morotai (liquor was transported in RAAF aircraft). Caldwell said it was the only way to negotiate getting equipment from them (how Aussie of him)! The liquor trafficking occurred before the “mutiny” and both were reduced to the rank of Flight Lieutenant. Caldwell requested a discharge from the RAAF. Gibbes was later reinstated as a Squadron Leader and in July 1945 was sent to work on the staff at RAAF Headquarters in Melbourne. Both left the RAAF in 1946.
THE AIR ACES
RAAF aces served in all theatres of the war and by 1945 there were 103 of them. These men included the top Australian ace of World War Two, Group Captain Clive “Killer” Caldwell.
Clive Caldwell

Caldwell from NSW served in the RAAF from 1940-1946. He flew the Curtiss P-40 Tomahawk/Kittyhawk in North Africa and the Middle East; and later the Supermarine Spitfire in the defence of Australia and New Guinea in the Pacific theatre. Caldwell flew over 300 operational missions and achieved 28.5 confirmed air to air victories including German, Italian and Japanese fighters (Messerschmitt Bf-109, Macchi C.202 and Mitsubishi Zero), bombers and reconnaissance aircraft. On his first mission back in Australia in early 1943 he shot down 2 Japanese aircraft in the defence of Darwin.
Caldwell was one of the most successful Allied pilots in North Africa and in 1941 he perfected his skills by devising a method of shot deflection to hit a moving target by aiming and firing at his own aircrafts shadow on the desert floor below. This style of shooting would result in the aircrafts shells hitting above and just behind the shadow (perfect for hitting an enemy aircraft you were chasing). This became known as “shadow shooting“. RAF Air Chief Marshall Sir Arthur Tedder was impressed he issued a directive for squadrons to quickly adopt this method in the desert theatre.

Caldwell was awarded the Distinguished Service Order (DSO) and Distinguished Flying Cross (DFC) for his bravery in combat. His engagements included combat with German aces whom he bested (such as Wolfgang Lippert – 29 victories, Hans-Arnold Stahlschmidt – 59 victories and Erbo Graf von Kageneck – 67 victories) and in one incident in December 1941 he shot down 5 Junkers Ju-87 Stuka dive bombers in a matter of minutes (he received the award of a bar to his DFC for this incident)! Eventually as the war went on air to air victories were hard to come by as the Japanese forces were pushed further and further back in retreat. His last air to air victory was achieved on August 17th, 1943 when he shot down a Japanese Mitsubishi Ki-46 Dinah reconnaissance aircraft.
In late 1943 he was transferred to Mildura to command No. 2 Operational Training Unit. In 1944 he returned to Darwin to command No. 80 Squadron (Spifires) and then in 1945 to Morotai in the Netherlands East Indies with the same squadron.

Caldwell earned and disliked the nickname “Killer” from a practice common on both sides during the North African campaign, where pilots would shoot to kill enemy pilots who had bailed out and were coming down in a parachute. It was an ugly part of war and the intent was that they couldn’t come back to fly another day. The story goes that Caldwell started doing this in 1941 after he was incensed from seeing a friend suffer the same fate at the hands of German pilots. The nickname was also apparently given for using up any ammunition left over from sorties to fire upon enemy troop convoys on the way back to his base.


In 1945 during the “Morotai Mutiny” Caldwell resigned in disgust at the RAAF being relegated to “mop up” duties. Despite his war-time heroics his RAAF career ended in 1946 under controversy and a court-martial trial over his involvement in selling alcohol to US servicemen that was transported in RAAF aircraft. The outcome upon his guilty plead was that his rank was lowered by 3 rungs from Acting Group Captain to Flight Lieutenant and Caldwell requested a discharge from the RAAF. The whole incident and what was seen as harsh treatment upon Caldwell was not received well by the public, but his entrepreneurial ways paid off though as he later became a successful businessman living to the ripe old age of 84 (he passed away in 1994).
Adrian Goldsmith

Another top Australian ace was Squadron Leader Adrian Phillip (Tim) Goldsmith from New South Wales who served in the RAAF from 1940 to 1945 with 16.25 air to air victories (4 pilots contributed to shooting down one aircraft apparently His unofficial total was 19.25). He served in the European theatre, most importantly flying Hawker Hurricanes and Supermarine Spitfires with RAF crews from the island of Malta. During the unsuccessful 1942 Axis siege of that island he shot down 12.25 German and Italian aircraft. He was awarded both the Distinguished Flying Medal (DFM) and DFC for his brave actions in the skies over Malta in 1942.
In July 1942 Goldsmith returned to Britain as a flying instructor before returning to Australia in 1943 as a Flight Commander in defence of the northern city of Darwin, where he shot down 4 Japanese aircraft. 1944 saw him return to the role of flight instructor and in 1945 he was discharged from the RAAF on medical grounds. He sadly died in 1961 at the young age of 39, following complications from a medical operation.

Charles Scherf

An important Australian ace of World War Two was my distant relative, Squadron Leader Charles Scherf from NSW who although serving in the RAAF flew the De Havilland Mosquito in Canadian Squadron 418 on low-level, hair-raising interdiction missions over Europe tearing up the German war machine. During his 38 missions he achieved 13.5 air to air victories and destroyed numerous other aircraft, vehicles and the apparatus of war. Many of his victories were actually achieved when he was meant to be working a desk bound role!
Scherf was also awarded the DSO and DFC for bravery. Sadly he was lost at the very young age of just 32 in a 1949 car accident. These men along with the other Australian aces were the heroes of the day and received great attention in the press back at home and around the world.

A Notable First

Sergeant Leonard ‘Len’ Waters (1924-1993) became the first Australian Aboriginal to become an RAAF fighter pilot. The former shearer signed up with the RAAF in 1942. He originally trained as an aircraft mechanic before switching to flight training in 1943. He graduated as a pilot in 1944.
Len Waters would go on to fly 95 operational sorties in Curtiss P-40N Kittyhawk fighters with No. 78 Squadron in the Dutch East Indies during 1944/45. He mostly flew ground attack missions as there was not much Japanese aircraft opposition by that stage of the war. On one mission his aircraft was struck by a Japanese 37mm anti-aircraft shell, which wedged itself inside his cockpit but miraculously did not detonate. He managed to fly safely for another 2 hours back to base with that shell wedged in there!
Len left the RAAF in 1946 with the rank of Warrant Officer. Despite hopes of starting a regional airline, he unfortunately never flew again and returned to the country life of a shearer (he could not source the funding or government support for the airline).
WORLD WAR TWO ENDS
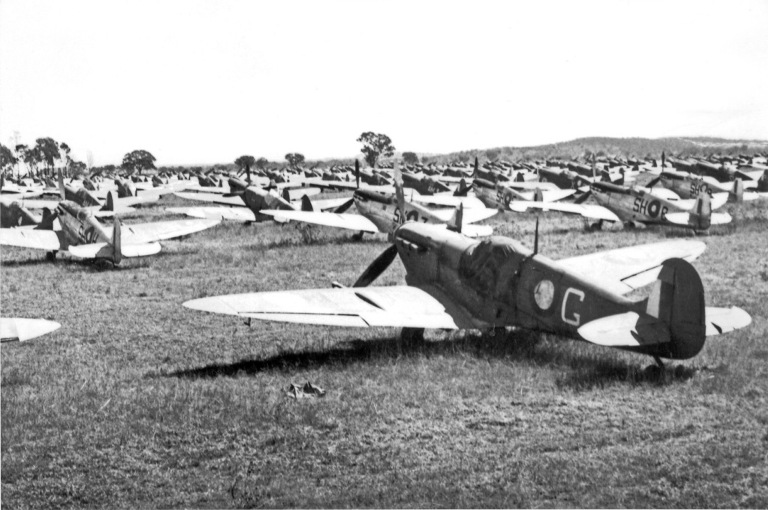
Throughout World War Two 189,700 men and 27,200 women had served in the RAAF (9,870 of them lost sadly their lives in the war with more than 50% lost over Europe alone – many were lost flying bombers deep over enemy territory). By 1944 the RAAF consisted of 6,200 aircraft across 61 squadrons. By wars end on September 2nd, 1945 when Japan officially signed surrender papers the RAAF was the fourth largest air force in the world (1. USA, 2. Soviet Union and 3. UK), but the air force was significantly reduced post war and many of these aircraft were sadly scrapped for their precious metal. I hate seeing those old photos of vast number of Spitfires and the like being destroyed! They were machines of war though and were no longer required.


By 1947 the Australian Government had announced a target of just 16 squadrons, 13,000 personnel and 144 aircraft for RAAF peacetime operations. This was a far cry from 2 years before! Peace did not last for very long though.
The Cold War started in 1947 and the long stand-off against Communist forces led or backed by the Soviet Union eventually resulted in the outbreak of a “hot” war once again. This time in Korea where war broke out in 1950 when Communist North Korea invaded South Korea. My next article will discuss this early Cold War period and the role the RAAF played in keeping Communist forces at bay.
Resources:
ADF-Serials Newsletter October-November 2007
Australian Dictionary of Biography
Australian War Memorial – Leonard Waters
National Archives of Australia
National Museum of the US Air Force
Prisoners Of War Of Japanese 1942-45
RAAF Air Power Development Centre – RAAF pilot downed German Arado jet-bomber

[…] the key stages of the RAAF: 1914 to 1939 (World War One and the interwar years), 1939 to 1945 (World War Two), 1945 to 1953 (the Cold War begins and the Korean War) and 1953 to the present day (Communist […]
LikeLike
Hi, In reference to your description of the stationing of “7 x P-39D in August 1942 for RAAF use near Brisbane in Queensland”; I believe the ‘drome referred to here would be that at Lowood which was adjacent to Mt. Tarampa. Lowood airstrip hosted (I understand) both US and Australian aircrew with Bell P-39 Airacobras being flown by both nationalities.
Post-war till the sixties a road-racing track incorporated the Lowood airstrip as its main straight. Even today various concrete bunkers can be discerned at various sites around Mt Tarampa.
http://en.wikipedia.org/wiki/Lowood_Airfield_Circuit
http://www.ozatwar.com/ozatwar/lowood.htm
LikeLike
Hi John, thanks for the background info. Its always interesting to get this sort of information. Must have been a busy place in its day?
LikeLike
[…] stages of the RAAF: The Early Years – 1914 to 1939 (World War One and the interwar years), World War Two – 1939 to 1945, The Cold War begins and the Korean War – 1945 to 1953 and finally 1953 […]
LikeLike
What an exceptional account of the RAAF during World War II. Thank you for you work.
LikeLike
Thankyou. Much appreciated! You may like to read the Korean War edition too. I need to get around to writing the final part (although I may make it a 5 part series instead of 4).
LikeLike
Just reading this comment… now I know I am sane of mind and not crazy for writing so much about WWII.
LikeLike
Reblogged this on Lest We Forget and commented:
About the RAAF
LikeLike
Wow!
I am IMPRESSED by that brief history!
I knew just a little about the RAAF mostly about the planes they flew.
Canada and Australia have similarities.
Many Australians came to trained in Canada.
Now whenever I find the name of an Australian in my research on the BCATP it won’t be the same.
Yes Deano,,, I have a blog dedicated to the BCATP also. Eugene Gagnon was trained in Canada… that’s a no brainer… but he became a staff pilot at Paulson, Manitoba before being sent overseas with 23 Squadron.
Who has ever heard about Paulson, Manitoba?
Who has ever heard about Eugene Gagnon?
Who has ever heard about Charles Curnow Scherf?
That’s the reason we write so much.
LikeLike
You will enjoy these blogs then:
https://acesflyinghigh.wordpress.com/2012/12/17/nhill-fly-in-2012/
https://acesflyinghigh.wordpress.com/2013/03/09/restoring-an-avro-anson/
LikeLike
I will read them later.
Thanks for guiding me.
Pierre
LikeLike
This taken from Wikipedia about the mutiny does not surprise me.
The Chief of the Air Staff, Air Vice Marshal George Jones, would later contend that the RAAF, in the words of Air Force historian Alan Stephens, “was ‘side-stepped’ out of the final victory over Japan by MacArthur, who wanted all the glory for himself
This does not apply only to MacArthur.
Canadians felt the same way towards how British used them during WWII.
The Dieppe raid is an example. The blame does not lay just only on the British.
In a way, why let your own forces get killed when you can get someone else to do the job…?
I am sure veterans would have such stories to tell.
LikeLike
Yes it was a strange affair. The Dieppe raid is one of the more bizarre decisions of WW2
LikeLike
The ‘RAAF Recruiting’ Photo near the end has me puzzled. With 10 RAF aircrew, including an unknown Air Marshal, and only one RAAF pilot in the right background, could you advise when this was used by the RAAF?
LikeLike
Hi Dave, your puzzlement is warranted. I had accidently pasted over the correct caption (I obtained this photo via the Royal Canadian Air Force Museum as it features my relative Charles Scherf). The correct caption: The day following their successful engagement with the enemy, during which they destroyed seven enemy aircraft and badly damaged another, a Royal Canadian Air Force Mosquito Squadron was visited by the Air Officer Commanding the RCAF Overseas, Air Marshal L.S. Breadner and the second in command, A/V/M N.R. Anderson. Shown above with the Air Marshal and the Air Vice-Marshal are the members of the crews who took part in the successful trip into enemy skies. From left to right, Air Marshal L.S. Breadner; F/L J. Johnson, Omemee, Ont.; F/O J. Gibbons, Vancouver; P/O S. Wilson, Leeds Eng.; W/C G.C. Maxwell, AFC, DFC, MC, Commanding Officer of the RAF station where the Canadians are based, W/C D.C.S. MacDonald, Vancouver, Commanding Officer of the Canadian squadron; F/O J. Caine, Edmonton, Alta.; F/O A. Brown, Winnipeg; A/V/M Anderson; W.O. E. Boal, Regina; and F/L c. Scherf, Glen Ennis, N.S.W., Australia. (Source: Royal Canadian Air Force Museum – Researcher: Bill Nurse)
LikeLike
Thanks. I missed the small shoulder name on two uniforms hence my assumption they were RAF
LikeLiked by 1 person
Thanks for a very informative and readable account of the RAAF in WW2. Lots I didn’t know, lots more to absorb. Well done.
LikeLike
Thanks Tony!
LikeLike
[…] Air Force (RAAF): The Early Years – 1914 to 1939 (World War One and the interwar years), World War Two – 1939 to 1945, The Cold War begins and the Korean War – 1945 to 1953, South East Asian […]
LikeLike
[…] Air Force (RAAF): The Early Years – 1914 to 1939 (World War One and the interwar years), World War Two – 1939 to 1945, The Cold War begins and the Korean War – 1945 to 1953, South East Asian […]
LikeLike
[…] Air Force (RAAF): The Early Years – 1914 to 1939 (World War One and the interwar years), World War Two – 1939 to 1945, The Cold War begins and the Korean War – 1945 to 1953, South East […]
LikeLike